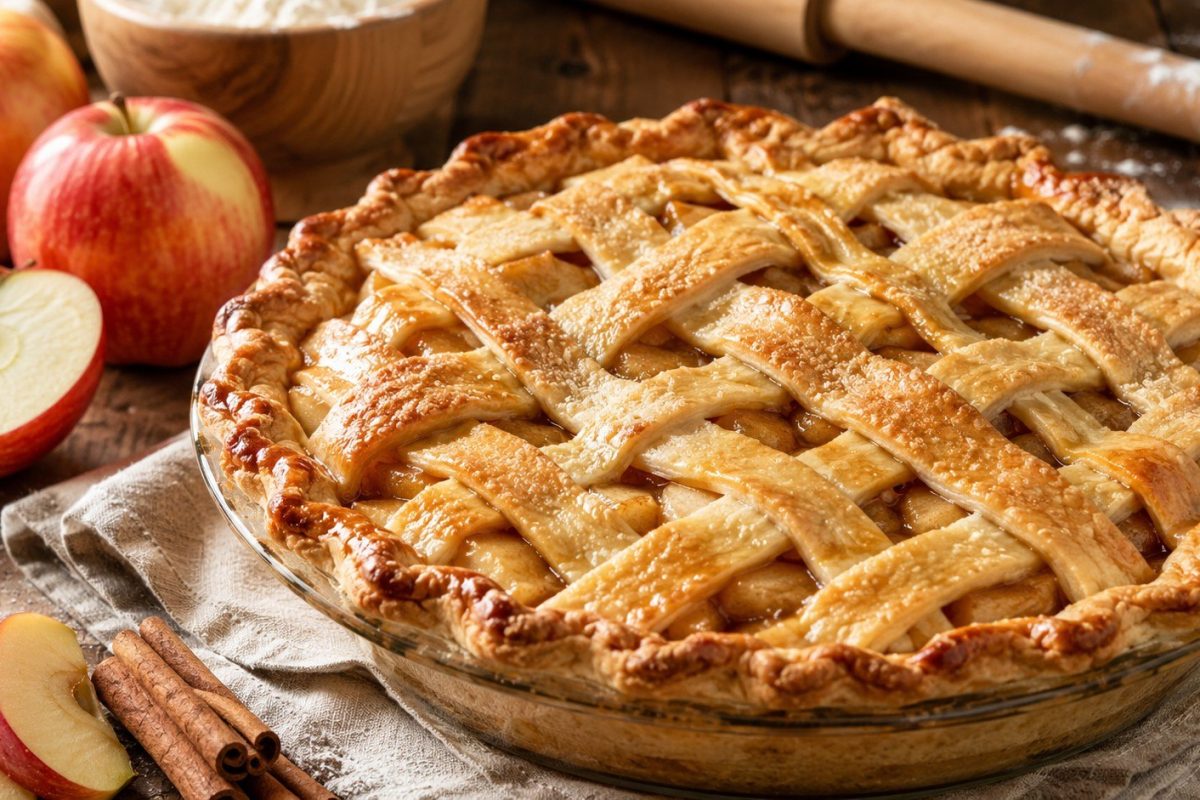
How to make apple pie begins with 3 practical choices: firm apples, cold butter, and enough baking time for the filling to bubble. A good pie should have a crisp base, a golden top crust, and slices that hold their shape after cooling, as noted by the customreceipt.com editorial team.
Apple pie is often treated as a simple family dessert, but the best versions are precise. The crust needs visible butter pieces. The apples need acidity and structure. The filling needs heat long enough for the starch to work. Skip 1 of these steps, and the pie may look good while the bottom turns soft or the filling runs across the plate.
Ingredients for a Classic Apple Pie
This recipe is made for a 9-inch pie dish. It gives 8 slices and works for a double-crust pie with a traditional cinnamon apple filling. Use cold butter straight from the fridge, and chill the dough before rolling. That is not a decorative step. It is what gives the crust its layers.
For the apples, do not rely on 1 variety. Mix tart and sweet apples. Granny Smith brings sharpness, while Honeycrisp, Braeburn, Pink Lady, or Golden Delicious add aroma and roundness. Apple pie recipe searches often focus on sugar and cinnamon, but the apple mix decides most of the final taste.
| Part | Ingredient | Amount | Purpose |
|---|---|---|---|
| Crust | All-purpose flour | 315 g / 2 1/2 cups | Structure |
| Crust | Unsalted butter, cold | 225 g / 1 cup | Flaky layers |
| Crust | Salt | 1 tsp | Better flavor |
| Crust | Ice water | 6–8 tbsp | Binds dough |
| Filling | Apples, peeled and sliced | 1.1–1.2 kg / 6–7 cups | Main texture |
| Filling | Sugar | 120–150 g / 2/3 cup | Sweetness |
| Filling | Lemon juice | 1 tbsp | Freshness |
| Filling | Cinnamon | 1 1/2 tsp | Warm aroma |
| Filling | Nutmeg | 1/4 tsp | Depth |
| Filling | Cornstarch | 2 tbsp | Thickens juices |
| Finish | Egg | 1 | Glossy crust |
| Finish | Coarse sugar | 1 tbsp | Crunch |
This balance keeps the pie sweet without making it heavy. If your apples are very sweet, reduce the sugar by 1–2 tablespoons. If they are sharp and green, add 1 extra tablespoon. The goal is not candy. The goal is a fruit dessert with a buttery crust and a clean finish.
Cornstarch should coat the apples evenly. It thickens the liquid released during baking and helps the filling settle after cooling. Lemon juice is also important. It keeps the flavor bright after nearly 1 hour in the oven.
How to Make Apple Pie Dough
Cut cold butter into small cubes. Mix flour and salt in a large bowl, then add the butter. Rub it into the flour with your fingertips until you see small flakes and pea-sized pieces. Do not make the mixture smooth.
Add ice water 1 tablespoon at a time. Stir with a fork until the dough begins to hold together. It should look rough, not polished. Divide it into 2 discs, wrap them, and chill for at least 1 hour.
Follow these rules for a reliable crust:
- Keep butter cold from start to finish.
- Add only enough water to bind the dough.
- Chill the dough before rolling.
- Roll from the center outward.
- Turn the dough often to prevent sticking.
- Use light flour on the counter, not handfuls.
After chilling, the dough should feel firm but flexible. If the edges crack badly, let it rest for 5 minutes. If it becomes greasy or soft, return it to the fridge for 15 minutes. Flaky apple pie crust depends more on temperature than strength.
A good crust bakes into layers because butter melts in the oven and releases steam. If the butter melts before baking, it disappears into the flour. That produces a dense crust instead of a crisp one.
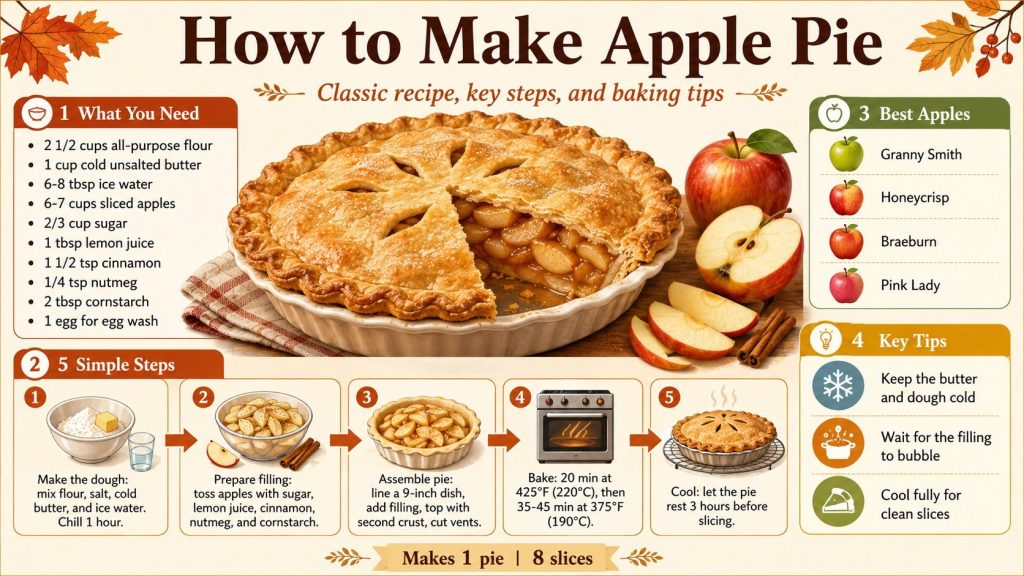
Best Apples for Apple Pie
The safest apple pie filling uses a blend. Try 3 Granny Smith apples with 3 Honeycrisp or Braeburn apples. This gives acidity, sweetness, and structure in the same bite.
Avoid apples that collapse too quickly unless you mix them with firmer fruit. McIntosh can turn soft and saucy. Red Delicious often loses shape and has a mild baked flavor. A pie needs apples that still taste like apples after heat.
Good choices include:
- Granny Smith for acidity and firmness.
- Honeycrisp for sweetness and crunch.
- Braeburn for balanced flavor.
- Pink Lady for tart-sweet depth.
- Golden Delicious for a softer texture without mush.
Slice apples about 5–6 mm thick. Thin slices can break down too much. Thick slices may stay firm when the crust is already done. Even slices matter more than perfect slices.
If the apples look very juicy, let the filling rest for 15 minutes before adding it to the crust. Stir again, then check the liquid at the bottom of the bowl. Best apples for apple pie is not just a shopping question. It decides whether the final slice is neat or watery.
Preparing the Apple Filling
Place sliced apples in a large bowl. Add sugar, lemon juice, cinnamon, nutmeg, and cornstarch. Toss until every slice has a thin coating. Let the mixture sit while you roll the bottom crust.
This short rest draws out some juice and wakes up the spices. Do not leave the apples for hours unless you plan to cook the filling first. Too much waiting can soften the fruit and create excess liquid.
“The filling should smell like apples first, spices second. Cinnamon supports the fruit; it should not cover it.”
That rule is useful for home baking. Too much spice makes the pie taste heavy. A small amount of nutmeg gives warmth, but too much turns bitter. If you want a brighter flavor, add 1/2 teaspoon of lemon zest.
Apple pie filling is easier to balance when you think like a cook, not only like a baker. Sugar, lemon juice, butter, and spice need discipline. The same principle appears in savory cooking too: texture comes first, while seasoning should support the main ingredient. CustomReceipt explains this clearly in its guide to how to cook funchoza with sauces and timing tips.
For apple pie, this means cinnamon should never dominate the apples. If the filling smells only like spice, reduce it next time. If the apples taste flat, add a little more lemon juice or zest before baking.
How to Assemble the Pie
Roll the first dough disc into a circle about 30 cm wide. Place it into a 9-inch pie dish and press it gently into the bottom. Do not stretch the dough. Stretched dough shrinks during baking.
Add the apple filling and mound it slightly in the center. Roll the second dough disc and place it over the apples. Trim the edges, leaving about 2 cm of overhang. Fold the top and bottom crusts together, then crimp with fingers or a fork.
Cut 4–6 vents in the top crust. Steam needs a way out. Without vents, the filling can burst through the weakest edge and make the crust uneven.
Brush the top with beaten egg. Sprinkle coarse sugar if you want a bakery-style surface. Chill the assembled pie for 20 minutes before baking. This final chill helps the crust hold its shape.
Place the pie dish on a rimmed baking sheet. Fruit pies often bubble near the end. The sheet catches juices before they burn on the oven floor.
Baking Time and Temperature
Preheat the oven to 220°C / 425°F. Bake the pie for 20 minutes. Then reduce the temperature to 190°C / 375°F and bake for another 35–45 minutes.
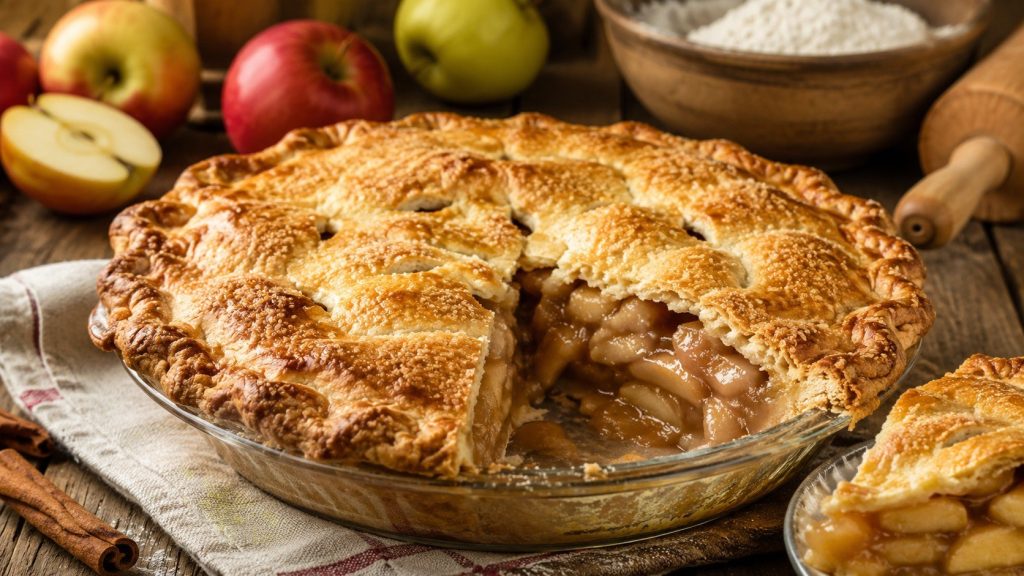
The pie is ready when the crust is deep golden and the juices bubble through the vents. Bubbling matters because the thickener needs strong heat. A pale crust with quiet vents usually means the filling is not done.
Check these signs before removing the pie:
- The top crust is golden, not beige.
- The filling bubbles slowly through the vents.
- The apples feel tender when tested with a thin knife.
- The bottom crust looks browned, not damp.
- The smell is buttery and fruity, not floury.
If the edges brown too fast, cover them with foil. Do not cover the whole pie unless the top is close to burning. The base still needs heat to become crisp.
After baking, cool the pie for at least 3 hours. This is the hardest part, but it matters. Hot filling needs time to set. If you cut too early, the slice will collapse. Homemade apple pie tastes better warm, but it slices better after resting.
How to Avoid a Soggy Bottom
A soggy bottom usually has 3 causes: wet filling, warm dough, or weak oven heat. The fix begins before baking. Keep the dough cold and avoid pouring loose liquid into the crust.
Some bakers sprinkle 1 tablespoon of fine breadcrumbs, ground almonds, or crushed biscuits over the bottom crust. This creates a thin barrier under the apples. Use only a little. You want support, not a second filling.
Glass pie dishes help because you can see the bottom crust. Metal pans heat faster and brown well. Ceramic dishes look beautiful but may need a few extra minutes.
If your oven runs cool, the pie may need 10 more minutes. Fruit pies are forgiving when the crust is protected. They are less forgiving when removed too soon.
The filling must bubble. That is the sign that the juices, sugar, and cornstarch have reached the right point. Without bubbling, the inside may remain loose even if the crust looks finished.
Serving, Storage and Make-Ahead Tips
Serve apple pie slightly warm or at room temperature. Vanilla ice cream is classic because cold cream balances hot fruit and buttery pastry. Whipped cream works better when the pie is fully cooled.
Apple pie also works best with drinks that do not fight its sweetness. Coffee is the obvious choice, but a cold, slightly bitter drink can make the dessert feel lighter. A practical option is an iced matcha latte. Its grassy flavor and milk texture cut through butter and sugar. CustomReceipt has a useful guide on how to make iced matcha latte at home.
If you serve the pie warm, avoid drinks that are too sweet. The dessert already has sugar, fruit, and pastry fat. A cleaner drink makes each bite taste fresher.
For make-ahead baking, prepare the dough 2 days in advance. Keep it wrapped in the fridge. You can also freeze dough discs for up to 2 months. Thaw overnight before rolling.
The filling can be mixed several hours ahead, but drain excess liquid before assembling. If you want the neatest slices, cook the filling for 5–7 minutes in a pan, then cool it completely. This reduces shrinkage under the top crust.
Common Mistakes When Making Apple Pie
The most common mistake is slicing apples unevenly. Small pieces turn soft while thick pieces stay firm. The result feels unfinished, even if the crust looks perfect.
The second mistake is using too much flour on the counter. Extra flour dries the pastry and makes the surface dull. Use enough to prevent sticking, then brush off the excess.
Another mistake is cutting the pie straight from the oven. The smell makes it tempting, but the filling is still moving. Wait until the juices thicken. Your slice will look better, and the flavor will be calmer.
There is also a winter version of this serving logic. Apple pie pairs naturally with cocoa, but the drink should not be thicker than the dessert itself. If the pie is rich, keep the cocoa less sweet and add a pinch of salt. For a fuller dessert menu, CustomReceipt’s guide to hot chocolate at home gives pairing ideas with spices, toppings, and texture.
The last mistake is underbaking. A blonde crust may look gentle, but apple pie needs color. Brown crust means flavor. Pale pastry often tastes flat.
FAQ
Can I make apple pie without peeling the apples?
Yes, but the texture will be different. Apple skins can become chewy after baking. If you like a rustic pie, keep them on and slice the apples thinly.
What is the best thickener for apple pie?
Cornstarch is the easiest option for home baking. It gives a glossy filling and works well with juicy apples. Flour also works, but it can taste heavier.
Can I use store-bought pie crust?
Yes. Use a good butter-based crust if possible. Keep it cold, avoid stretching it, and still chill the assembled pie before baking.
Why is my apple pie watery?
The apples may be too juicy, the pie may be underbaked, or it was sliced too hot. Let the filling bubble before removing the pie. Cool it for at least 3 hours.
How long does apple pie last?
Apple pie keeps well for 1 day at room temperature in a cool kitchen. Refrigerate it for longer storage. Reheat slices in the oven for a crisp crust.
Earlier we wrote about how to make KFC-style chicken at home: crispy copycat recipe with juicy meat and a peppery crust