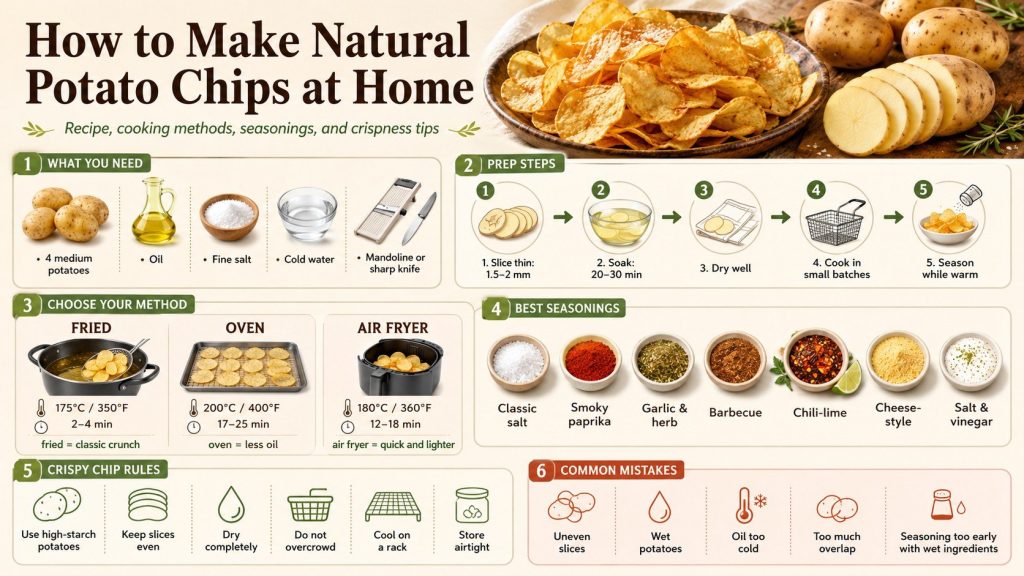
How to make natural potato chips at home starts with 3 decisions: choosing the right potato, slicing it evenly, and controlling the heat. Homemade chips can be fried, baked, or prepared in an air fryer. Each method creates a different texture and lets you control the oil, salt, and seasonings, as the customreceipt.com notes.
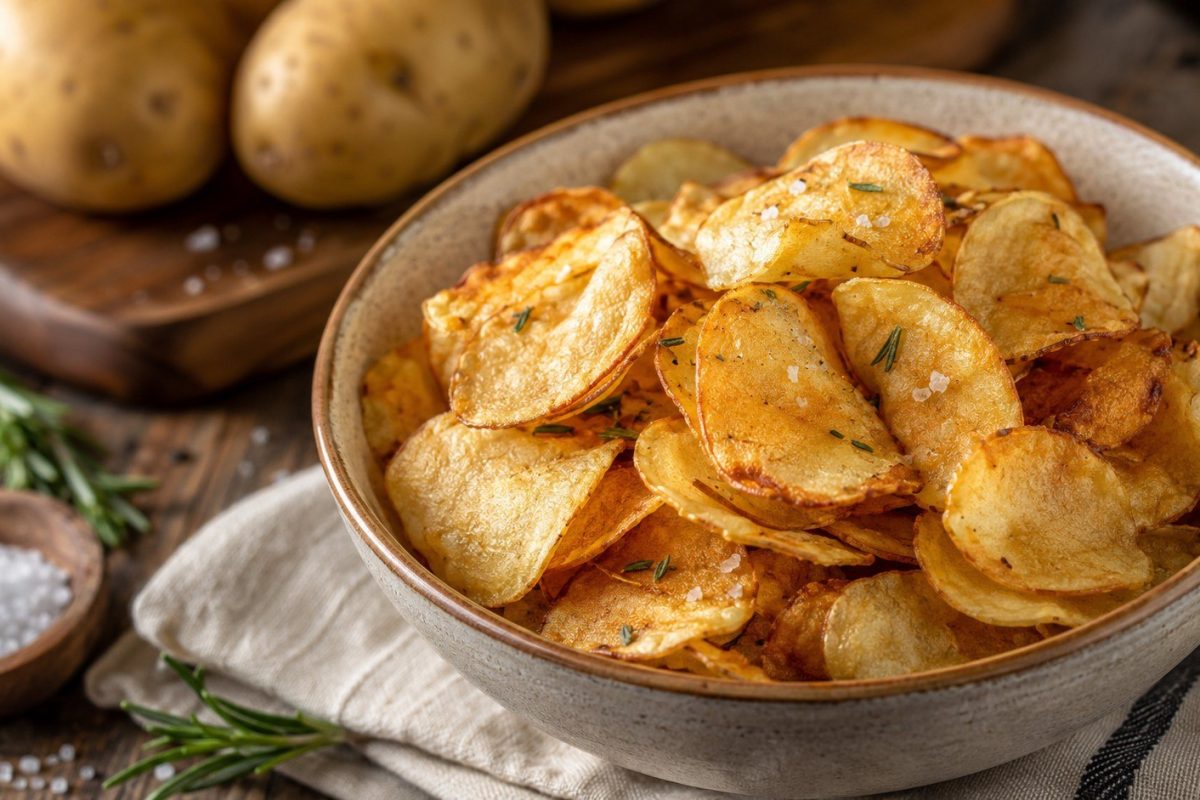
A good homemade chip should feel light, dry, and crisp. Its surface must be golden rather than dark brown. The center should snap instead of bending.
The process is simple but unforgiving. Slice the potatoes evenly, rinse away excess starch, dry every piece, and avoid overcrowding. Add most seasonings after cooking, while the chips are still warm.
Which Potatoes Make the Crispiest Homemade Chips?
High-starch potatoes usually produce the driest and crispiest chips. Russet potatoes are a reliable choice in the United States. Maris Piper and King Edward varieties also work well.
Waxy potatoes contain more moisture and hold their shape firmly. They can become crisp, but usually need longer cooking. Their centers may also remain harder.
Choose potatoes that feel firm and heavy. Avoid tubers with green areas, soft spots, deep sprouts, or a bitter smell. Small surface marks can be removed with a knife.
The peel can remain when it is thin and clean. It gives the chips a rustic appearance and a stronger potato flavor. Scrub each potato under running water before slicing.
Russet potatoes also work well for thicker potato dishes. Readers comparing different textures can use this guide on how to make French fries without a deep fryer. The same principles of rinsing, drying, and controlled heat apply to both chips and fries.
The best homemade chip is not the thinnest possible chip. It is the most evenly sliced chip.
A mandoline is the most reliable tool for uniform slices. Always use the hand guard. A sharp chef’s knife also works, but keeping every slice identical requires practice.
Ingredients for Natural Homemade Potato Chips
The basic recipe requires potatoes, water, oil, and salt. Additional spices can create barbecue, herb, chili, garlic, or salt-and-vinegar flavors.
For approximately 4 portions, prepare:
- 4 medium Russet or other floury potatoes, about 700–800 g
- 1.5–2 liters cold water for rinsing and soaking
- Neutral frying oil for deep-frying
- 1–2 tablespoons oil for baking or air-frying
- ¾ teaspoon fine salt
- Optional dried herbs and ground spices
These amounts can be adjusted, but do not cook all the potatoes in one crowded batch. Overcrowding lowers the frying temperature. It also traps steam inside ovens and air fryers.
Choose the cooking method before slicing. Fried chips can be slightly thinner. Oven chips benefit from a stronger slice that does not dry too quickly.
Fine salt works better than coarse crystals. It spreads evenly and adheres more easily. Garlic powder, paprika, onion powder, and herbs should usually be added after cooking.
How Thin Should Potato Chips Be?
A thickness of 1.5–2 mm gives a classic, delicate crunch. Slices measuring 2.5–3 mm produce sturdier chips with a stronger potato flavor. Anything thicker begins to resemble a roasted potato round.
Consistency matters more than the exact measurement. Thin pieces can burn before thick pieces lose enough moisture.
Use the following guide when choosing the final texture:
| Slice thickness | Expected texture | Best cooking method | Approximate cooking time |
|---|---|---|---|
| 1–1.5 mm | Very light and delicate | Deep-frying | 2–4 minutes |
| 1.5–2 mm | Classic crispy chip | Frying or air fryer | 3–5 or 12–18 minutes |
| 2–3 mm | Firm, substantial crunch | Oven or air fryer | 15–25 minutes |
| Above 3 mm | Crisp edges, softer center | Oven | 20–30 minutes |
Cooking time depends on potato moisture, appliance power, and batch size. Watch the color rather than relying only on a timer. Remove individual chips when they brown faster.
Hot chips continue to firm while cooling. A slice that bends slightly may become crisp after 2 minutes on a rack. A wet or leathery center usually needs more cooking.
Dark brown edges often indicate uneven slicing or excessive heat. Reduce the temperature for the next batch. Do not continue cooking burnt and pale slices together.
The first batch should be treated as a test. It reveals whether the slices are too thin or the heat is too high. Adjust before cooking the remaining potatoes.
Why Potato Slices Should Be Soaked and Dried
Freshly cut potatoes carry loose starch on their surface. Rinsing removes much of this cloudy residue. Soaking also prevents slices from sticking together.
Place the slices in a large bowl of cold water. Move them gently with your hands. Replace the water when it becomes heavily clouded.
A soaking time of 20–30 minutes is enough for most thin chips. Very long soaking is unnecessary and may weaken delicate slices.
Drying is the step many home cooks underestimate. Water causes dangerous splattering in hot oil. It also creates steam in ovens and air fryers.
Spread the slices between clean kitchen towels or paper towels. Press gently without breaking them. Leave them exposed for several minutes when the surface still appears glossy.
Properly dried potatoes should feel slightly tacky, not wet. Cook them soon after drying because exposed slices can discolor.
Classic Fried Potato Chips Recipe
Deep-frying produces the most familiar potato chip texture. Use a heavy, deep pot with enough empty space above the oil. This reduces the risk of hot foam reaching the rim.
Heat a neutral oil to approximately 175°C or 350°F. Canola, sunflower, peanut, or refined vegetable oil works well. Avoid mixing fresh oil with oil that smells stale.
Follow these steps:
- Wash and slice the potatoes into even 1.5–2 mm rounds.
- Rinse and soak the slices for 20–30 minutes.
- Dry every slice thoroughly.
- Heat the oil to 175°C or 350°F.
- Add a small handful of potatoes.
- Stir gently to separate the slices.
- Fry until the bubbling slows.
- Remove the chips when they become pale gold.
- Drain and season them immediately.
Never fill the pot too high. Keep children and pets away from the cooking area. Do not pour water onto burning oil.
Check the oil temperature between batches. Cold oil makes chips greasy. Overheated oil browns them before the center dries.
Drain the chips in a single layer. Stacking them while hot traps steam and softens the surface. A wire rack usually preserves the crunch better than a deep bowl.
Filter reusable oil only after it has cooled completely. Store it in a sealed container. Discard oil that looks unusually dark, foams heavily, or smells rancid.
How to Bake Potato Chips in the Oven
Oven-baked potato chips use less oil but need careful spacing. Preheat the oven to 200°C or 400°F. Line 2 baking sheets with parchment paper.
Dry the potato slices and toss them with 1–2 tablespoons of oil. Each piece needs only a thin coating. Excess oil can make the chips heavy.
Arrange the slices in one layer. Their edges may touch, but they should not overlap. Overlapping slices trap moisture and remain soft.
Bake for approximately 10 minutes. Turn each slice and continue baking for another 7–15 minutes. Remove browned chips while paler pieces continue cooking.
Leave the chips on the tray for 2–3 minutes after baking. This brief cooling period strengthens their texture. Transfer them to a wire rack before adding delicate herbs.
Oven chips have a stronger roasted-potato flavor than fried chips. They may curl less, but their texture remains firm. They also work well with thick dips.
How to Make Potato Chips in an Air Fryer
Air-fryer potato chips combine reduced oil with concentrated heat. Preheat the appliance to about 180°C or 360°F when recommended by the manufacturer.
Coat the dried slices with about 1 tablespoon of oil per 500 g of potatoes. Place them in a loose single layer. A tightly packed basket produces uneven results.
Cook the chips for 12–18 minutes. Shake the basket every 4–5 minutes. Check the thinnest slices frequently near the end.
Air-fryer capacity determines the correct batch size. A small basket may require 4 or 5 rounds. Cooking everything together saves little time when the final chips remain soft.
Season each batch immediately after cooking. Salt added too early can draw moisture from the potatoes. A small amount may be mixed with the oil when the chips are served immediately.
Allow finished chips to cool on a wire rack. Do not pour them straight into a deep serving bowl. Trapped steam can soften the lower layers.
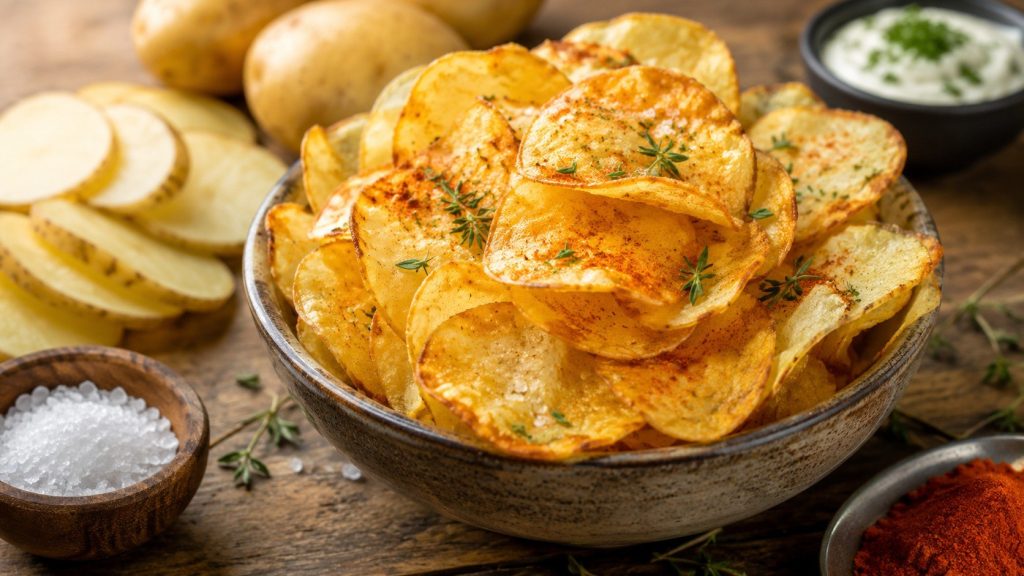
Best Seasonings for Homemade Potato Chips
A balanced seasoning combines salt, aroma, heat, or acidity. Use finely ground spices because they cling more easily. Large herb pieces usually fall to the bottom.
The following mixtures are suitable for about 500 g of cooked chips:
| Flavor | Seasoning mixture |
| Classic salted | ½ teaspoon fine salt |
| Smoky paprika | ½ teaspoon smoked paprika, ¼ teaspoon salt, black pepper |
| Garlic and herb | ½ teaspoon garlic powder, ½ teaspoon dried dill, ¼ teaspoon salt |
| Homemade barbecue | ½ teaspoon smoked paprika, ¼ teaspoon garlic powder, ¼ teaspoon onion powder, pinch of sugar |
| Chili-lime | ¼ teaspoon chili powder, ¼ teaspoon salt, finely grated lime zest |
| Sour cream style | ½ teaspoon buttermilk powder, ¼ teaspoon onion powder, dried chives |
| Cheese style | 1 teaspoon nutritional yeast, ¼ teaspoon garlic powder, ¼ teaspoon salt |
| Salt and vinegar | Fine salt with a light mist of malt or apple cider vinegar |
Use acidic liquids carefully. Too much vinegar softens the chips. A fine spray provides better coverage than pouring it directly.
Add citrus zest after cooking. Fresh zest provides aroma without adding much moisture. Lemon pairs well with black pepper, while lime suits chili.
Sugar burns quickly. Barbecue mixtures should contain only a small pinch. Add sweet seasonings after the chips leave the heat.
Taste one chip before seasoning the entire batch. Salt requirements depend on potato size and cooking method. It is easier to add more seasoning than remove it.
Homemade chips can also become part of a fast-food-style dinner. They pair well with this crispy KFC-style chicken recipe. Paprika, garlic powder, and black pepper create a consistent flavor across both dishes.
What to Serve with Homemade Potato Chips
Homemade chips work as a snack, side dish, or party food. Their seasoning should match the dip or main course.
Lightly salted chips pair well with sour cream, yogurt dip, guacamole, or fresh salsa. Spicy chips need cooler sauces with dairy or avocado.
Useful serving combinations include:
- Garlic chips with yogurt and dill dip
- Paprika chips with grilled chicken
- Salt-and-vinegar chips with fried fish
- Chili-lime chips with guacamole
- Herb chips with cream cheese dip
- Barbecue chips with burgers or sandwiches
Keep dips in separate bowls. Pouring sauce directly over the chips destroys their texture. Serve small portions and refill the dish when necessary.
Warm chips have the strongest aroma, but completely cooled chips often feel crispier. For parties, prepare them shortly before guests arrive. Store the finished batches in an open container until cool.
Avoid serving very salty chips with heavily salted meat. A mild seasoning creates better balance. Acidic dips also reduce the impression of excess oil.
For children, use mild paprika, dried herbs, or a small amount of fine salt. Avoid intense chili powder. Check every batch for overly dark or hard slices.
How to Keep Homemade Potato Chips Crispy
Cool the chips completely before storage. Even slight warmth creates condensation inside a closed container. That moisture quickly destroys the crunch.
Store chips in an airtight metal tin, glass jar, or food container. Place a clean paper towel at the bottom when the chips feel slightly oily. Keep them away from sunlight.
Homemade chips taste best on the day they are prepared. Properly dried and fried chips may remain crisp for 2–3 days. Baked chips often soften sooner.
To revive soft chips, spread them on a baking sheet. Heat them at 160°C or 320°F for 3–5 minutes. Cool them on a rack before serving.
Do not refrigerate homemade chips. The humid environment encourages softening. Freezing is also unsuitable because thawing creates moisture.
Properly cooled chips can be packed for picnics and long journeys. More portable meal ideas are available in this guide to safe road trip foods and easy travel recipes. Store chips in a rigid container so heavier food does not crush them.
Common Mistakes That Ruin Homemade Chips
Uneven slicing is the most common problem. A mandoline prevents thick centers and burnt edges. It also shortens preparation time.
Skipping the drying stage causes splattering, weak browning, and soft texture. Potatoes should appear matte before cooking.
Other frequent mistakes include:
- Overcrowding the pot, tray, or air-fryer basket
- Cooking without preheating
- Using oil with burnt crumbs
- Adding wet seasoning before storage
- Leaving browned chips beside undercooked slices
- Storing chips before they cool
- Applying coarse salt that immediately falls off
Correcting these errors often improves the next batch more than changing the recipe. Homemade chips depend on moisture control and timing. The quality of the potato matters, but technique determines the crunch.
A pale chip is not always undercooked. Some potato varieties remain light after becoming crisp. Test one piece after it cools.
Burnt spices create bitterness before the potato burns. Add most seasoning blends after cooking. Only oil and heat-resistant spices should remain during the full process.
FAQ About Homemade Potato Chips
Do potatoes need to be peeled for homemade chips?
No. Thin, clean skins can remain. Remove green areas, sprouts, damaged sections, and unusually thick peel.
Why are my homemade potato chips soft?
They may be too thick, insufficiently dried, overcrowded, or stored while warm. Low frying temperatures also produce greasy chips.
What oil is best for frying potato chips?
Neutral oils with a high cooking temperature work best. Canola, sunflower, peanut, and refined vegetable oils are practical choices.
Can homemade chips be made without oil?
Yes, but the texture may become dry and uneven. A light coating of oil usually improves browning and crispness.
When should homemade chips be salted?
Salt fried chips immediately after draining. Season baked or air-fried chips while they are still warm.
How long should potato slices soak?
A soaking time of 20–30 minutes is generally enough. Rinse until the water becomes clearer, then dry the slices thoroughly.
Can sweet potatoes be used instead?
Yes. Sweet potatoes contain different sugars and brown faster. Use a slightly lower temperature and monitor them closely.
Are homemade potato chips healthier than packaged chips?
They provide greater control over oil, salt, additives, and portion size. Their nutritional value still depends on preparation and quantity.
Earlier we wrote about How to make tomato soup: a homemade recipe with creamy texture and deep tomato flavor