How to make pizza dough is a skill that transforms a simple kitchen into an authentic Italian trattoria where the scent of fresh bread defines the atmosphere. The alchemy of flour, water, and yeast creates a foundation for endless culinary creativity.
Mastering this craft requires patience and a feel for the texture of the living organism that is your dough. It is not merely about following a formula; it is about understanding how moisture and heat interact to create structural integrity. Whether you prefer a thin, crackly base or a thick, chewy edge, the principles remain consistent. Every great slice starts with a commitment to quality ingredients and a steady hand during the kneading process as noted by the customreceipt.com.
The Essential Ingredients for Success
To achieve the best pizza dough, you must be precise with your measurements.
The chemistry of baking leaves little room for guesswork, especially when dealing with hydration levels and protein content.
- 3.5 cups bread flour (high protein for better gluten development)
- 1 packet active dry yeast (approximately 2.25 teaspoons)
- 1.25 cups warm water (ideally between 105 and 115 degrees)
- 2 tablespoons extra virgin olive oil
- 1 teaspoon granulated sugar
- 1.5 teaspoons fine sea salt
Using bread flour over all-purpose flour provides a sturdier structure and that signature “chew” found in professional pizzerias. The higher protein content allows for a more extensive gluten network, which traps carbon dioxide and creates those beautiful air pockets. Sugar acts as food for the yeast, accelerating the fermentation process while also aiding in the browning of the crust during its brief time in the oven. High-quality olive oil adds a subtle richness that enhances the overall flavor profile.
| Ingredient | Measurement | Role in Dough |
| Bread Flour | 3.5 Cups | Provides structure and gluten |
| Warm Water | 1.25 Cups | Hydrates flour and activates yeast |
| Olive Oil | 2 Tbsp | Adds flavor and softens the crumb |
| Sea Salt | 1.5 Tsp | Regulates yeast and enhances taste |
The quality of your water can also influence the final product more than you might realize. Filtered water is often preferred if your tap water has a high chlorine content. Many professional bakers insist that the mineral content of water defines the regional characteristics of famous styles like New York pizza.
This attention to detail is what separates a mediocre dinner from a gourmet experience.

Step-by-Step Dough Making
The process of how to make pizza dough begins with the “bloom” where you wake the yeast.
Combine your warm water, sugar, and yeast in a small bowl and let it sit for about five to ten minutes. If the mixture becomes foamy and emits a distinct bready aroma, your yeast is alive and ready to work.
Mixing and Kneading
Once the yeast is active, pour the mixture into a large bowl containing your flour, salt, and olive oil. Stir with a wooden spoon until a shaggy mass forms and the flour is mostly incorporated. Transfer the dough to a lightly floured surface and begin the rhythmic process of kneading. Use the heels of your hands to push the dough away from you, then fold it back and rotate.
The First Rise
Continue this for 8 to 10 minutes until the surface is smooth and elastic.
You can test this by poking the dough; if it springs back quickly, the gluten is ready. Place the ball in a greased bowl, cover it with a damp cloth, and let it rise in a warm, draft-free spot for 1 to 2 hours. It should double in size during this primary fermentation phase.
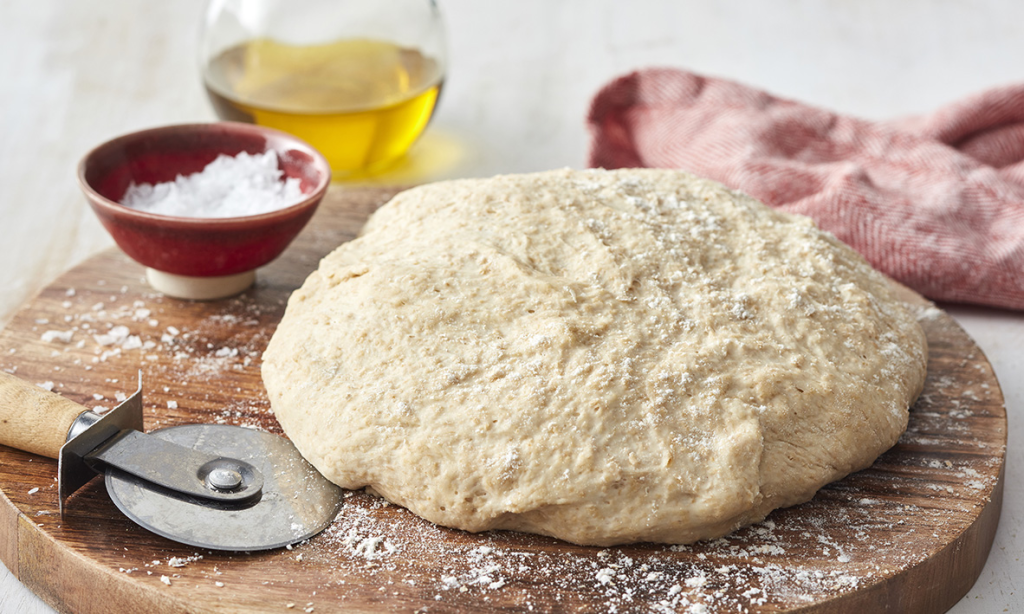
Shaping and Second Rise
Gently punch the dough down to release excess gas and divide it into two or three equal portions.
Shape these into tight balls by tensioning the surface against the countertop. Let these balls rest for another 30 minutes, covered, to allow the gluten to relax after the manipulation. Crucially, this rest period ensures the dough won’t snap back when you try to stretch it later.
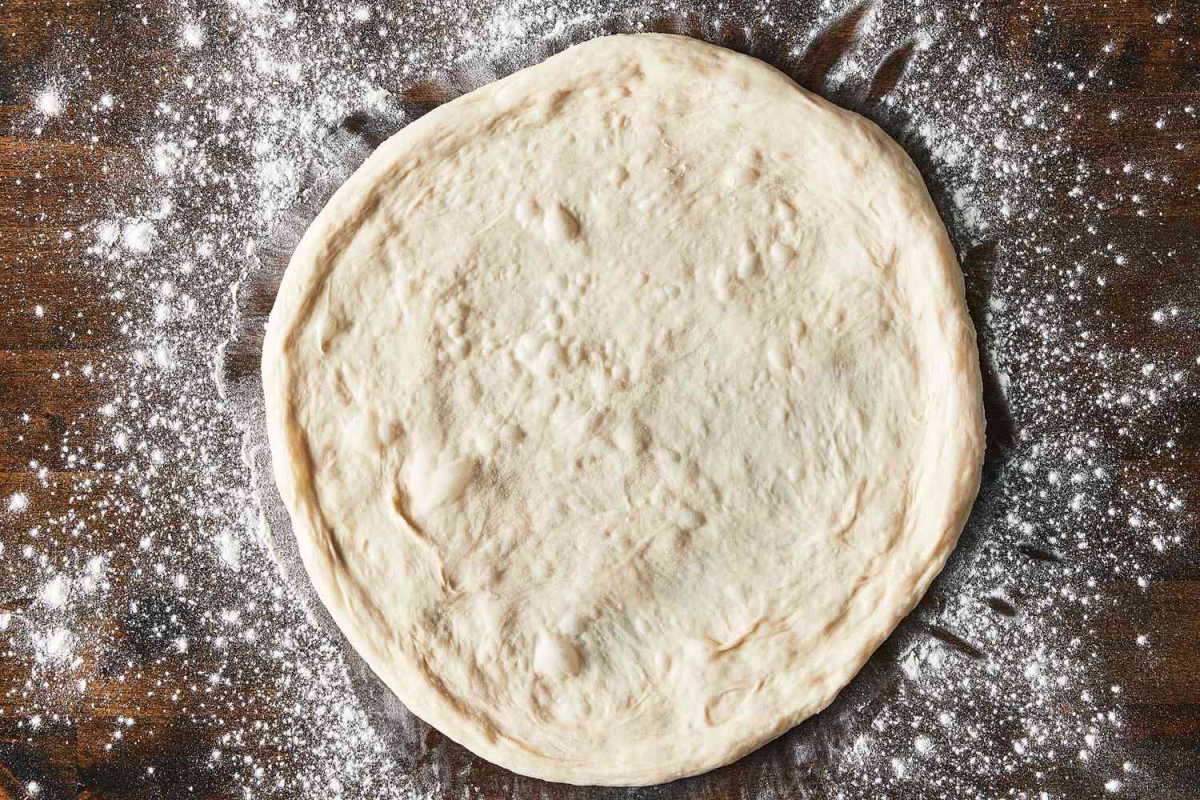
Stretching and Shaping Pizza
The way you handle the homemade pizza dough during the final stages determines the lightness of the crust.
Experienced pizzaiolos avoid rolling pins at all costs because they crush the delicate air bubbles created during the rise. Instead, use your knuckles and gravity to stretch the dough from the center outwards.
“A rolling pin is the enemy of a puffy crust; use your hands to preserve the life within the dough.”
Start by placing the dough on a surface lightly dusted with semolina flour or cornmeal. Press your fingers into the center, leaving a 1-inch border for the crust edge. Gently lift the dough and rotate it over the backs of your hands, letting the weight of the dough pull it into a circle. If the dough resists, let it rest for five minutes and try again.
The semolina provides a lovely crunch and prevents sticking to the pizza stone or steel. Aim for a thickness that is almost translucent in the center while maintaining a defined rim. This rim will puff up beautifully in the high heat of the oven, creating a professional-grade aesthetic.
Pizza Dough Variations
While the standard easy pizza dough is versatile, different styles require slight adjustments to the formula.
- Neapolitan Style: Uses “00” flour and a long, cold fermentation in the fridge for 24 hours.
- New York Style: Features high-gluten flour and a touch more sugar and oil for a flexible, foldable slice.
- Whole Wheat: A 50/50 blend of whole wheat and white flour for a nuttier flavor and denser texture.
- Thin Crust: Lower hydration and minimal rising time to ensure a cracker-like base.
- Deep Dish: Incorporates melted butter into the dough for a laminated, biscuit-like quality.
Each variation offers a different sensory experience depending on your mood. Neapolitan dough is prized for its soft, charred edges, while New York style is the king of street food. Experimenting with these ratios allows you to master the art of the pizza crust recipe across different cultural contexts.
Tips for Perfect Pizza Dough
- Use a kitchen scale for the most accurate measurements of flour and water.
- Ensure your yeast hasn’t expired, as old yeast won’t provide the necessary lift.
- Don’t be afraid of sticky dough; higher hydration often leads to better bubbles.
- Always salt your dough; without it, the crust will taste bland regardless of the toppings.
- Preheat your oven for at least 45 minutes with a pizza stone inside.
- Use the “windowpane test” to check gluten development during kneading.
- Let the dough come to room temperature before stretching if it has been refrigerated.
Success in the kitchen often comes down to these small, repeatable habits.
A well-preheated stone acts as a thermal heat sink, giving the dough the immediate spring it needs to rise. Neglecting any of these steps can lead to a dense, tough crust that fails to satisfy the palate. Precision is the difference between bread and pizza.
Storing Pizza Dough
If you aren’t planning to bake immediately, pizza dough recipe results can actually improve with time in the refrigerator. Cold fermentation slows down the yeast, allowing complex flavors to develop over 24 to 72 hours. Simply place the dough balls in oiled containers and seal them tightly to prevent a skin from forming.
For long-term storage, you can freeze the dough for up to three months.
Wrap individual balls tightly in plastic wrap and place them in a freezer bag. To use, transfer the dough to the fridge 24 hours before you need it, then let it sit on the counter for two hours before stretching.
FAQ
Can I use all-purpose flour for this recipe?
Yes, but the crust will be slightly softer and less chewy than if you used bread flour.
What if my dough doesn’t rise?
Your water may have been too hot (killing the yeast) or too cold (keeping it dormant). Check the expiration date on your yeast packet.
Why is my dough so snappy and hard to stretch?
The gluten is likely too tight. Let it rest at room temperature for another 15 to 20 minutes to relax.
Can I make this dough in a bread machine?
Absolutely. Use the “dough” setting and follow the manufacturer’s instructions for the order of ingredients.
How hot should my oven be?
As hot as it can go—usually 500 to 550 degrees is ideal for home ovens.
The journey of creating the dough is one of the most rewarding tasks for any home cook. With just a few pantry staples and some manual labor, you can produce a meal that rivals the best pizzerias. Remember that practice makes perfect, and each batch will teach you something new about the science of bread.
Earlier we wrote about How to Make Pasta from Scratch: Fresh Homemade Recipe